Having an infant through the summer can be difficult when it gets hot (although I'm sure being pregnant through the hot summer is probably far more miserable). We had a challenge with nap time for Graham in those hot weeks since we didn't have air conditioning. Graham needed to be swaddled, but all we had were cozy flannel blankets. He slept like a furnace as it was, so being swaddled in a warm flannel blanket was just more than I was willing to let him do when the temperature reached 90 degrees some days.
I found some plain cotton fabric and decided to make him a few simple blankets out of it. He still slept warm, so we'd swaddle him and then take a spray bottle filled with water and just spray the blanket down until it was pretty soaked. That kept him cool on the hottest days and he napped pretty comfortably.
Recently, however, I went to get him out of his crib and he had rolled over from his back onto his stomach. It was time to throw swaddling out the window. Surprisingly, it only took two days for Graham to adjust to not being swaddled during sleep time. He's always been a pretty good sleeper. Well, not at sleeping through the night, but when it's time to nap or go to bed he generally lays down quietly and goes right to sleep without a fight. Sometimes he'll lay there and just talk to himself for a few minutes before drifting off, but he does typically fall asleep very well. We did start from day one to establish that habit and so far it's been working out really well.
Anyway, Graham loves his cottong blankets. Sometimes if he's tired and he gets a little fussy, I'll stick his pacifier in his mouth, hand him his blanket, and he'll wad it up around his face, close his eyes, and immediately go to sleep. I find it amazing that he can sooth himself with the right couple of things. He's really an incredible baby boy.
So back to these blankets I made. I'm not a fan of hemming things--dresses, skirts, pants (well, pants aren't so bad), I just get bored of hemming things. I find it so boring. Turning under the edges of a blanket are exactly the same thing to me and I did not feel like doing that for these blankets.
So I got creative.
And then I got more creative.
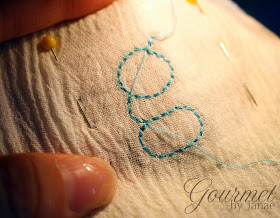
I ended up with a decorative edged monogrammed blanket.
And I love it!
Here's a tutorial on how to do it yourself.
Supplies:
woven cotton broadcloth or cotton gauze fabric
accent colored thread
paper
sewing machine
scissors
First, tear it down to size. Literally, you get to tear the fabric. Determine the size you want it to be, make a snip where the size will be right, and tear the fabric tdown to the length you want each side to be. You'll get a few stray threads coming off the edges, so just pull those off and continue on.
Next, finish the edges.I have a few decorative stitches on my sewing machine, so I picked one and went with it.
 |
| I used stitch number 4 for the edges, and number 15 for the monogrammed letter. |
I stitched about an eight of an inch from the torn edge, leaving some fringe around the outside of the blanket. Then pull off any threads that are parallel to the edge, leaving the nice fuzzy fringe-like threads.
Write or print the correctly sized letter(s) you want on a sheet of paper. I did a lower-case letter g for Graham's name. (And I used an expired coupon because I didn't want to waste a whole sheet of pretty new paper.)
And voila!
An adorable personalized baby blanket!
The possibilities for this technique are pretty endless. You can use it on clothing, on quilts, for wall decor, etcetera. If you decide to try this, please let me know! I'd love to see the ideas and projects you come up with!
I'm also planning on making and selling a few personalized blankets like this soon. Check my Etsy shop in the coming weeks to see what will be available!


No comments:
Post a Comment