Alright, it's official. I'm no longer posting here...
Because I'm starting to post on my new blog!
My first post went up there today. However, I'm waiting to throw a full-blown launch party until Monday next week so that I can work out all the kinks and problems. It still does have some little quirks, so please forgive me while I work those out.
Please, please follow me there! I'll be posting in Facebook and on Twitter as new posts go up, and once I get the RSS feed working and get links to other social media hubs up and running, you ought to be able to follow me as you please.
So go and see my latest post! There's a free printable template for some really cute Valentine candy boxes. I think you'll like them!

Showing posts with label home decor. Show all posts
Showing posts with label home decor. Show all posts
Wednesday, January 30, 2013
Monday, January 14, 2013
Chalkboard Frame Disaster and Solution
My sister-in-law is tough to gift shop for. It's not that she's picky or has expensive taste or anything like that. She's really fun and easy-going. But since I was making most of my gifts, that's where the biggest challenge was for me. She's really crafty too. Anything that I could think to make for her, she could probably make for herself and do a better job of it. I went through several ideas before finding a really big frame at a thrift store (about 2.5 feet by 3.5 feet) and deciding to make her a chalkboard.
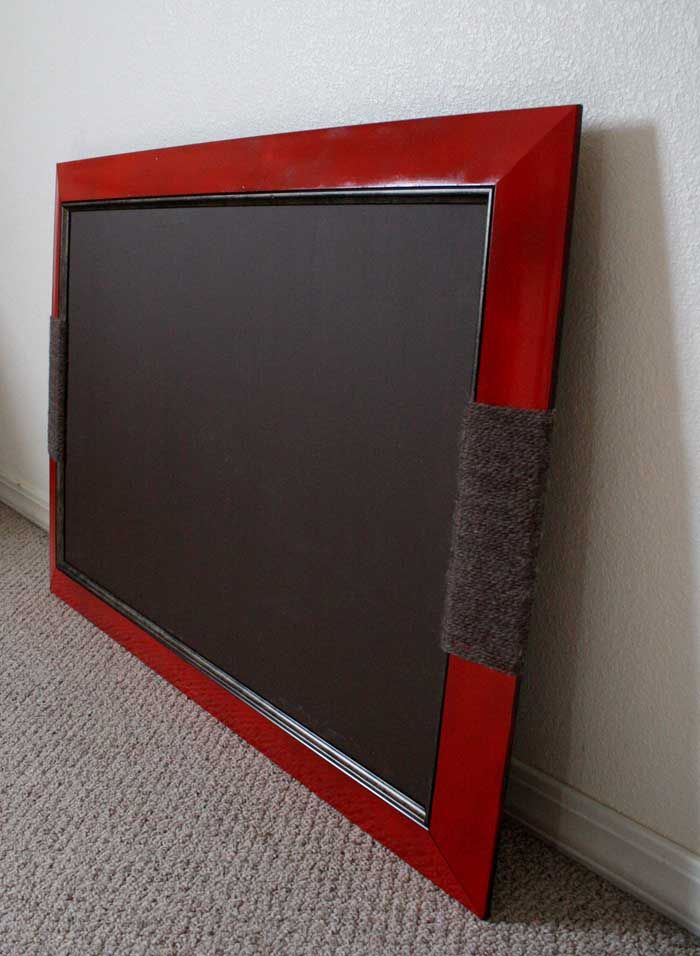
I left my husband in charge of getting it done. We bought the supplies we needed, I found my pint of brown chalkboard paint leftover from making my own chalkboard and bulletin board set, and I explained my vision of it to Bob. He offered some ideas, and with our combined thoughts, he got to work on it.
And then a setback happened, as they always do.
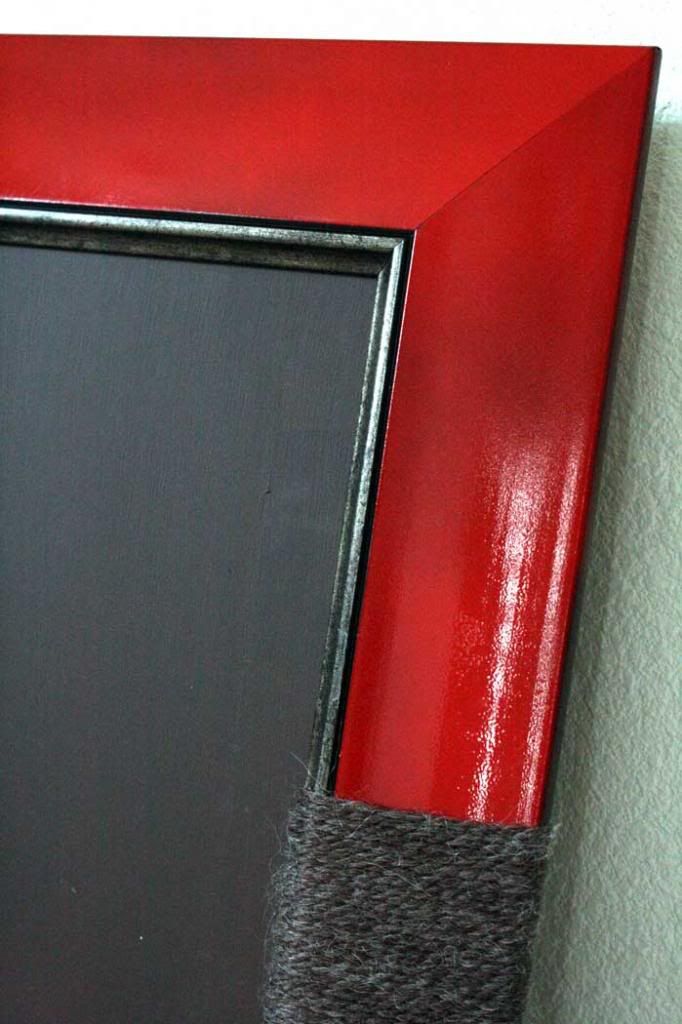
Bob spray painted the frame red, and while it was drying outside on a chilly evening, the wind blew it over and one side of it broke in half, jostling 3 of the corners loose.
A couple of screws, a paint stir stick, two kinds of glue, and a staple gun later, it was back together.
But there was still the problem of the obvious big crack in one side of the frame. (I failed to take any pictures of that, sorry.) But I had a decent solution for it.
I used Elmer's glue and some alpaca yarn I had leftover from the Christmas ornaments that I made for a craft swap, and used it to wrapped the side that had the crack in it, along with the opposite side of the frame so that it would be symmetrical and match. I put glue directly on the front of the frame where the yarn would be covering it, as well as on the back to keep it in place.
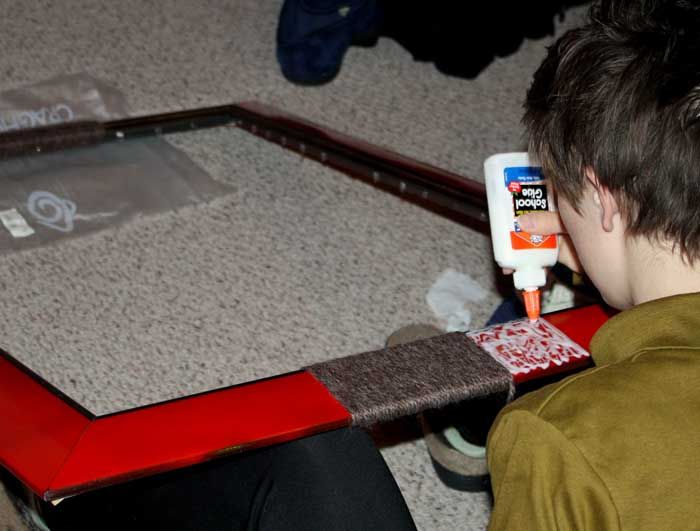
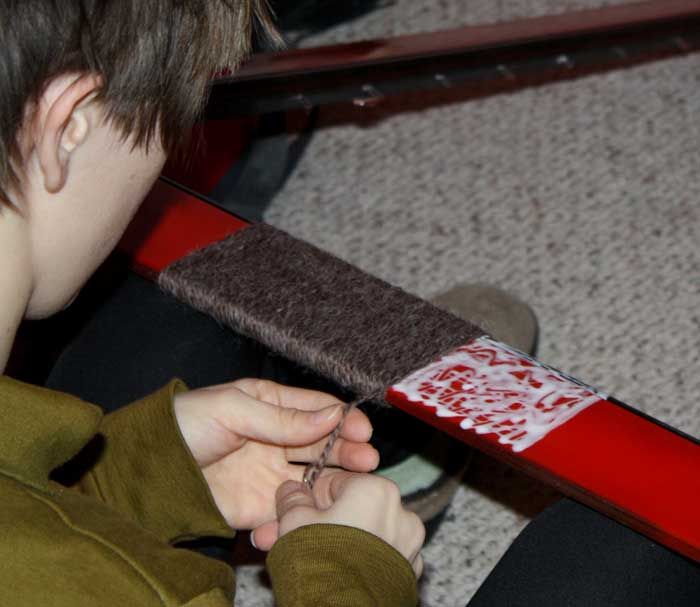
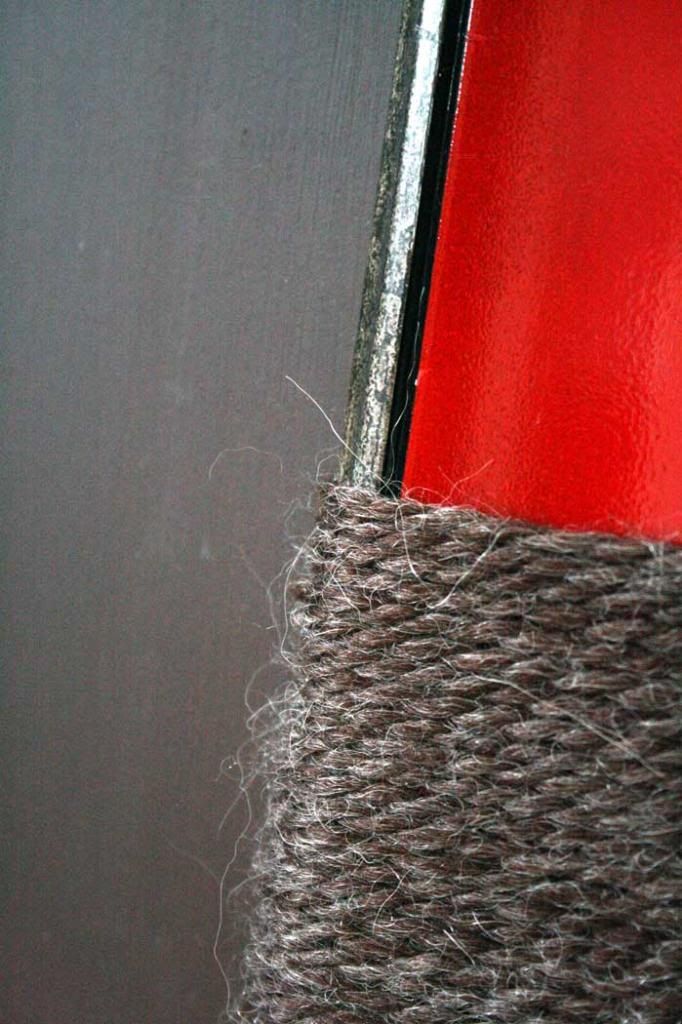
I think I like it more with the yarn around it than without it. And the cool thing about yarn is that it stretches a little bit, so as I wrapped it I tried to keep it sort of loose. That way when we put the chalkboard into the frame the yarn stretched enough to let it sit nice and flat inside of it.
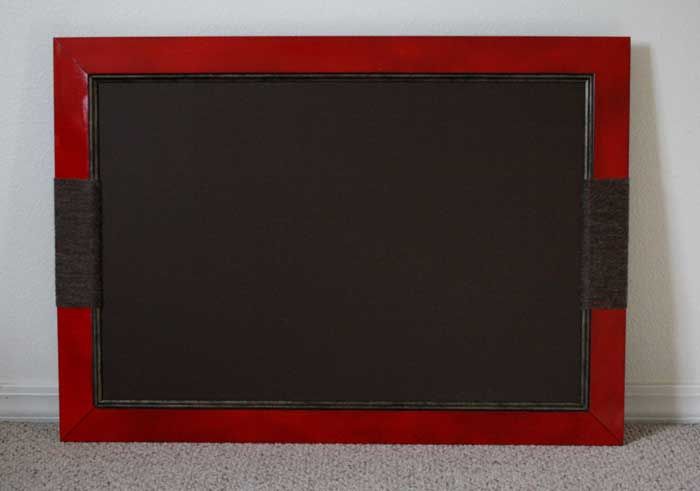
A tip: If you're making your own, or if you end up with one, I recommend that before using it for the first time take a piece of chalk and color in most of the chalkboard, then go back and erase it. That initial coat of chalk will make it erase better and more cleanly.
Ashley, I have no idea where you're going to put this (and if it stays in your closet for a while, that's fine too). But I hope it comes in handy at some point!
I left my husband in charge of getting it done. We bought the supplies we needed, I found my pint of brown chalkboard paint leftover from making my own chalkboard and bulletin board set, and I explained my vision of it to Bob. He offered some ideas, and with our combined thoughts, he got to work on it.
And then a setback happened, as they always do.
Bob spray painted the frame red, and while it was drying outside on a chilly evening, the wind blew it over and one side of it broke in half, jostling 3 of the corners loose.
A couple of screws, a paint stir stick, two kinds of glue, and a staple gun later, it was back together.
But there was still the problem of the obvious big crack in one side of the frame. (I failed to take any pictures of that, sorry.) But I had a decent solution for it.
I used Elmer's glue and some alpaca yarn I had leftover from the Christmas ornaments that I made for a craft swap, and used it to wrapped the side that had the crack in it, along with the opposite side of the frame so that it would be symmetrical and match. I put glue directly on the front of the frame where the yarn would be covering it, as well as on the back to keep it in place.
(I love that this alpaca yarn looks like a course string but is really soft to the touch.)
I think I like it more with the yarn around it than without it. And the cool thing about yarn is that it stretches a little bit, so as I wrapped it I tried to keep it sort of loose. That way when we put the chalkboard into the frame the yarn stretched enough to let it sit nice and flat inside of it.
A tip: If you're making your own, or if you end up with one, I recommend that before using it for the first time take a piece of chalk and color in most of the chalkboard, then go back and erase it. That initial coat of chalk will make it erase better and more cleanly.
Ashley, I have no idea where you're going to put this (and if it stays in your closet for a while, that's fine too). But I hope it comes in handy at some point!
Monday, January 7, 2013
Custom Monogrammed Mugs
It's tough to gift shop for my parents. They already have everything they need and anything else they might want is out of my price range. Last year I out-did myself and made a really unique wire wrapped tree for them.
This year I didn't know what to do. But there is this really good chocolate shop we love down here in San Diego, so we got my parents some really good drinking chocolate (Chili Burnt Caramel flavor) and some other chocolate too, so I made them some customized monogrammed mugs.
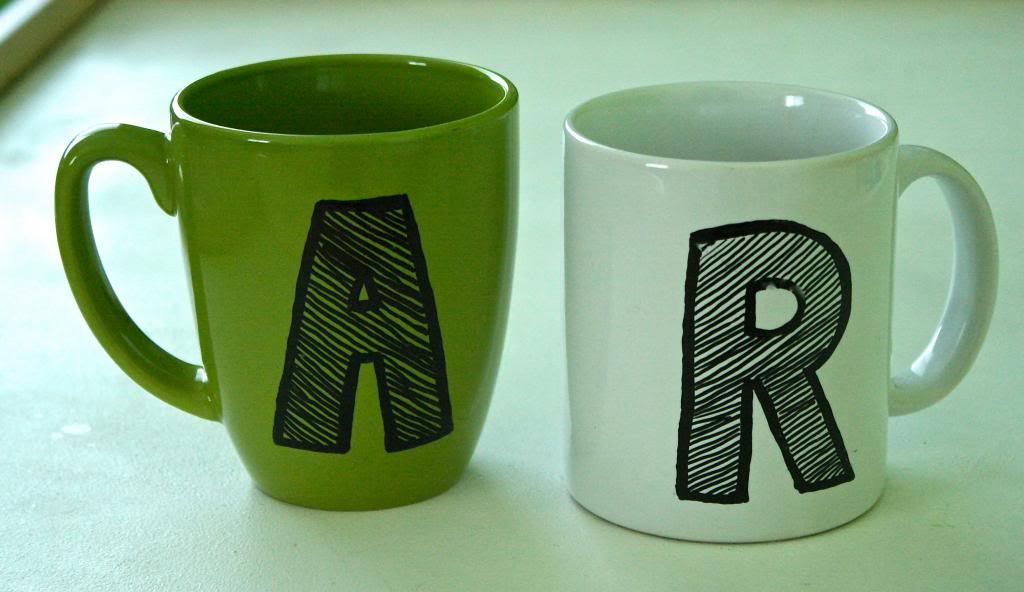
My dad is left-handed, so his letter is on the opposite side of his mug compared to my mom's, who is right-handed.

These are super easy to make. All you need is one or more clean porcelain mugs, an oil based Sharpie, an oven preheated to 300 degrees F, and 24 hours in advance of when you need them.
Draw whatever design you want on your mugs with the oil based Sharpie. Try using carbon transfer paper to trace your design on and then go over it with the ink.
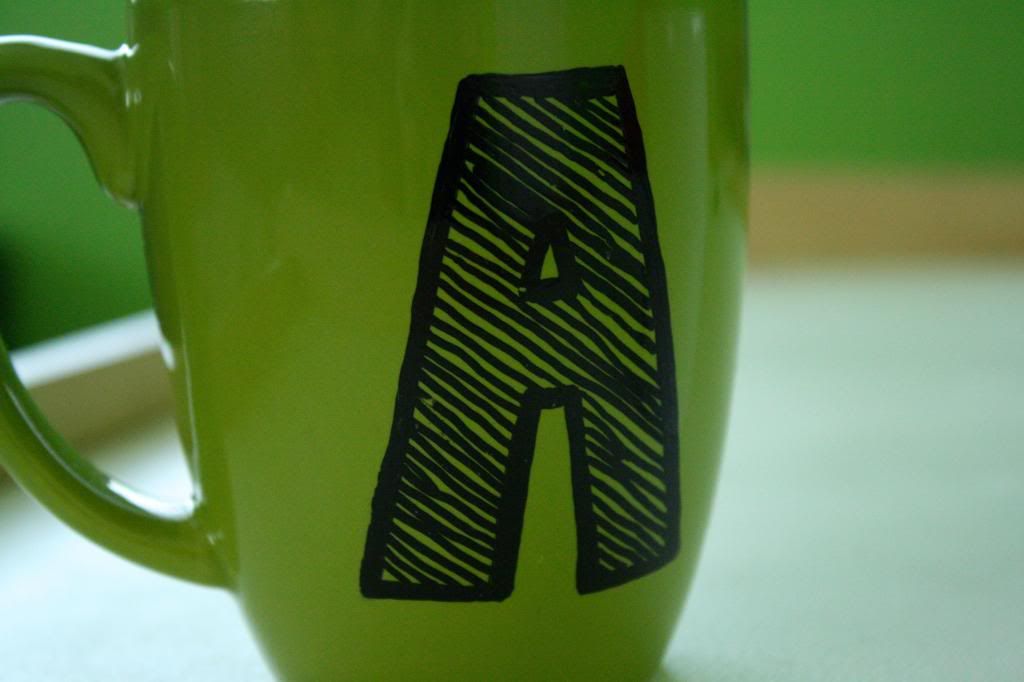
Be careful drawing on the mugs, because the ink runs really easily if you depress the tip too much... or at all sometimes. If it does run, Q-tips and paint thinner clean it up easily.
Once you're done with whatever design you want on your mugs, let them sit 24 hours so that the ink sets up well. Then bake at 300 degrees for 35-40 minutes. Try putting them on a cookie sheet so that they're easy to remove.
After they're baked, let them cool naturally at room temperature.
Care instructions: Hand wash as needed.
That's all there is to it. It's several little steps, but it's really simple and doesn't take very long (aside from the 24 hour wait).
I want to try this technique on plates and platters using other Sharpie colors. My imagination goes wild just thinking about the possibilities!
This year I didn't know what to do. But there is this really good chocolate shop we love down here in San Diego, so we got my parents some really good drinking chocolate (Chili Burnt Caramel flavor) and some other chocolate too, so I made them some customized monogrammed mugs.
My dad is left-handed, so his letter is on the opposite side of his mug compared to my mom's, who is right-handed.
These are super easy to make. All you need is one or more clean porcelain mugs, an oil based Sharpie, an oven preheated to 300 degrees F, and 24 hours in advance of when you need them.
Draw whatever design you want on your mugs with the oil based Sharpie. Try using carbon transfer paper to trace your design on and then go over it with the ink.
Be careful drawing on the mugs, because the ink runs really easily if you depress the tip too much... or at all sometimes. If it does run, Q-tips and paint thinner clean it up easily.
Once you're done with whatever design you want on your mugs, let them sit 24 hours so that the ink sets up well. Then bake at 300 degrees for 35-40 minutes. Try putting them on a cookie sheet so that they're easy to remove.
After they're baked, let them cool naturally at room temperature.
Care instructions: Hand wash as needed.
That's all there is to it. It's several little steps, but it's really simple and doesn't take very long (aside from the 24 hour wait).
I want to try this technique on plates and platters using other Sharpie colors. My imagination goes wild just thinking about the possibilities!
Wednesday, December 12, 2012
Noel Letters
I made this Christmas decoration about four years ago, but I love it and get it out every year to decorate for the holidays.
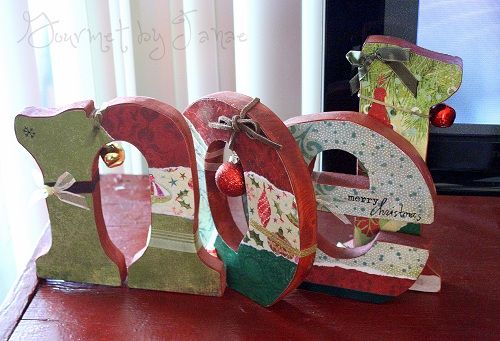
I was a missionary for my church, serving in Texas for a year and a half. I made these at a Relief Society activity in the middle of the week around Christmas time. I made a few other things, but they were gifts for family members that year.
These are simple to make though, as long as you're good with a jigsaw or can find pre-cut letters. The letters were all pre-cut for us (that made things way easier) out of 1" thick wood. Then we painted the letters, traced them onto decorative paper, and Modpodged it on. We finished these by adding ribbons, bows, mini ornaments, bells, and other little decorative things.
If you're planning on doing something like this, here are some tips and ideas:
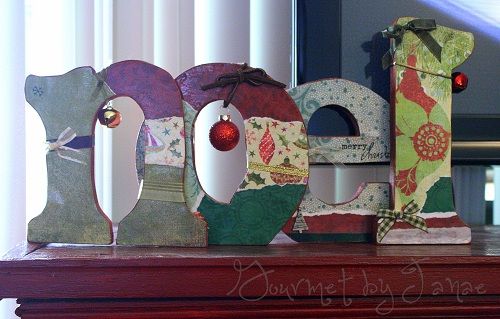
I was a missionary for my church, serving in Texas for a year and a half. I made these at a Relief Society activity in the middle of the week around Christmas time. I made a few other things, but they were gifts for family members that year.
These are simple to make though, as long as you're good with a jigsaw or can find pre-cut letters. The letters were all pre-cut for us (that made things way easier) out of 1" thick wood. Then we painted the letters, traced them onto decorative paper, and Modpodged it on. We finished these by adding ribbons, bows, mini ornaments, bells, and other little decorative things.
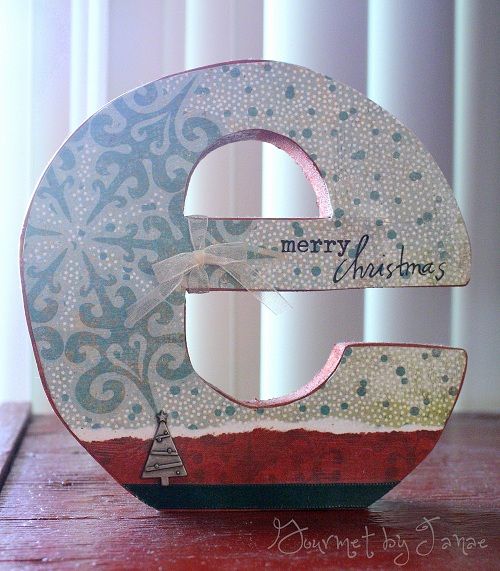 |
| This is my favorite letter I made. |
If you're planning on doing something like this, here are some tips and ideas:
- Use acrylic paint, and try watering it down. The wood grain will show through the paint, giving it a really pretty, unique look.
- You can also add water to the Modpodge to make it go a little further.
- Modpodge the letters, front and back to seal the wood and keep the paint from smearing, should they somehow get wet (you never know with kids or while in storage).
- To store these, wrap them in waxed or parchment paper. Tissue paper will stick the the Modpodge.
Monday, December 10, 2012
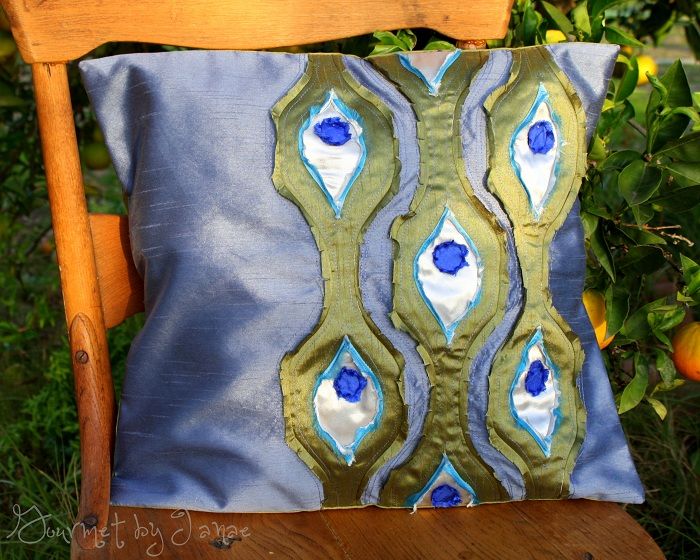
Abstract Peacock Throw Pillows
You may remember the post I did a while ago about the throw pillows I've been making for my sister-in-law. I finally finished the whole set! I love how they turned out. Here they are.
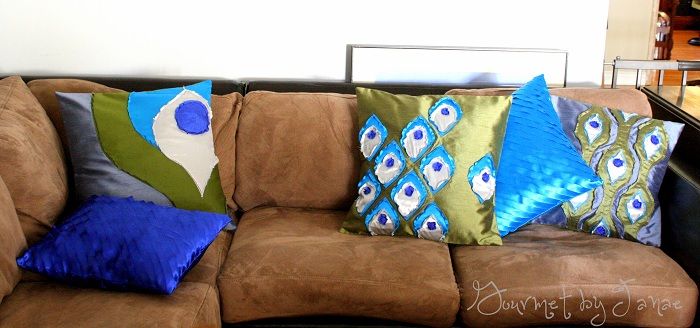
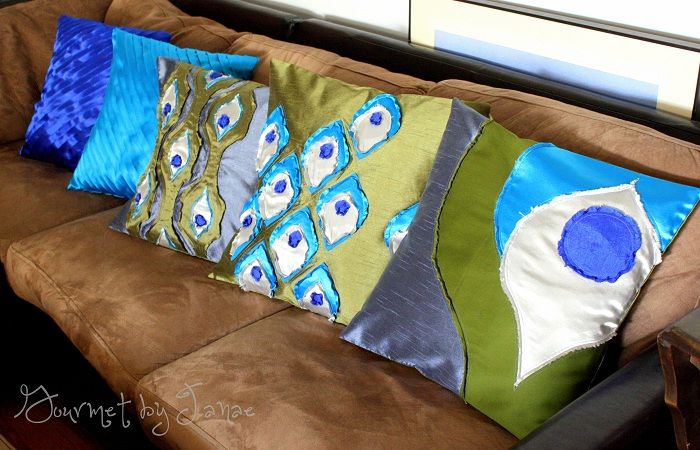
I like the color scheme she chose. I also really like how all of these shapes go together to give you the impression of peacock feathers without blatantly showing one.
I really like this applique technique that I came up with. I've never seen anything like it, but I love the exposed raw edges. It just takes a while to do. It's a good thing I'msort of patient.
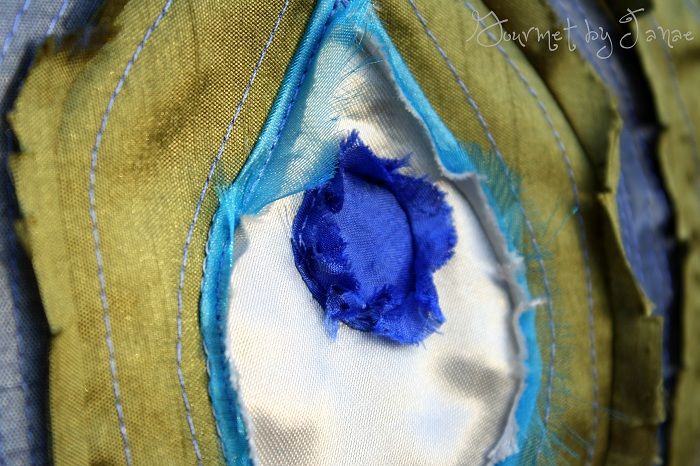
I love these feathered pillows with the surprise of color peeking out from underneath the layers. I think they're fun.
My favorite one is the last one I made. A combination of the colors, the design, the pattern and placement of the applique... There's something about it I find really aesthetically pleasing.
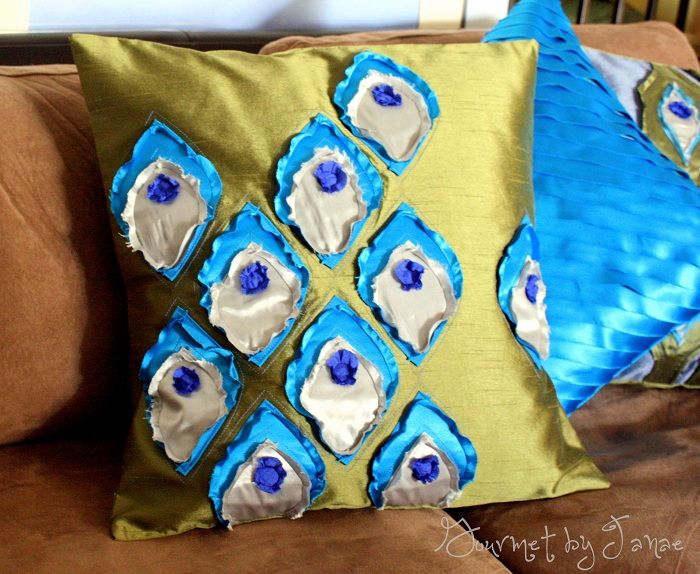
All of them have sham-style openings in the back and are all machine washable (a must-have for anyone with kids).
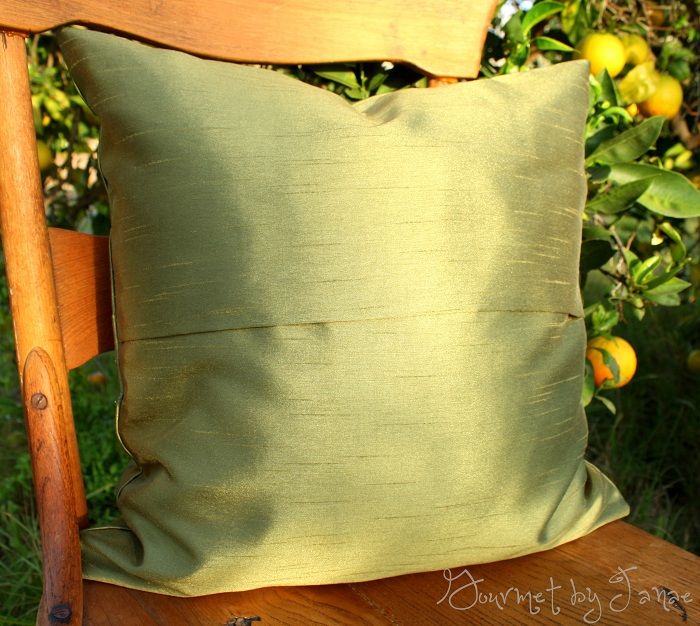
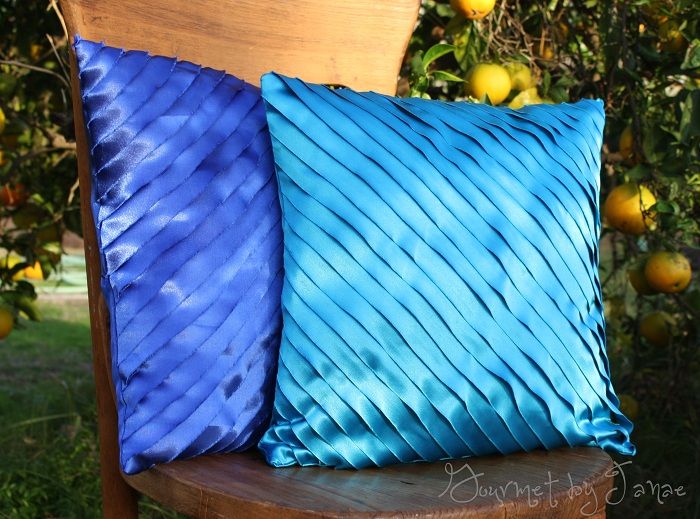
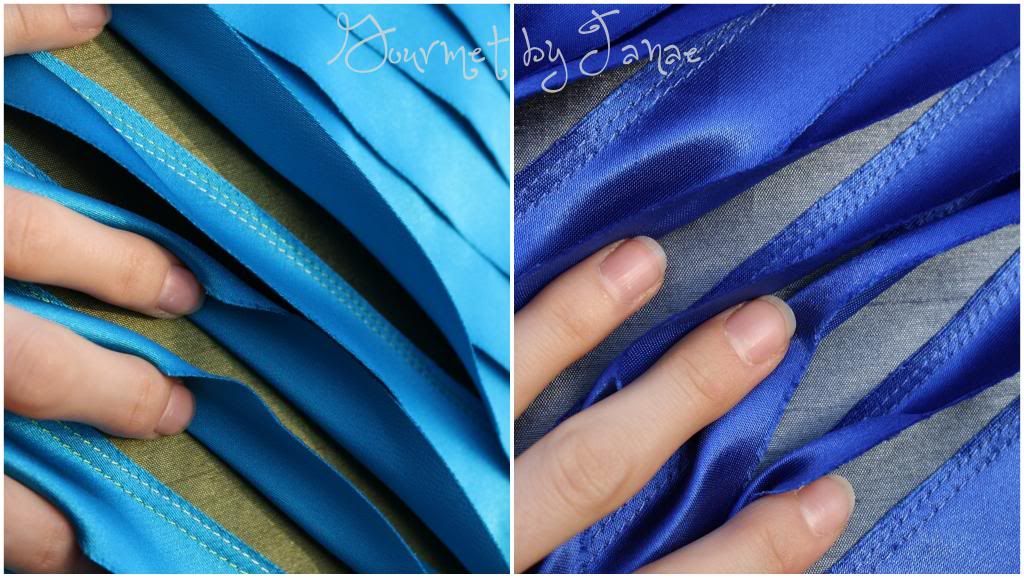
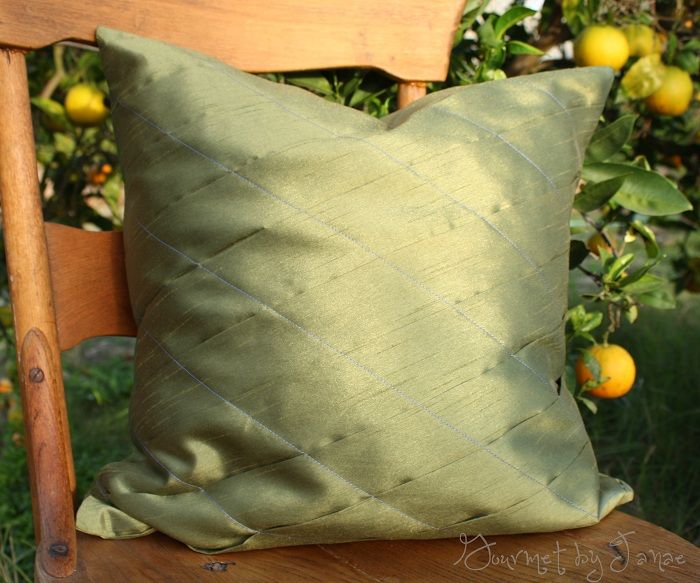
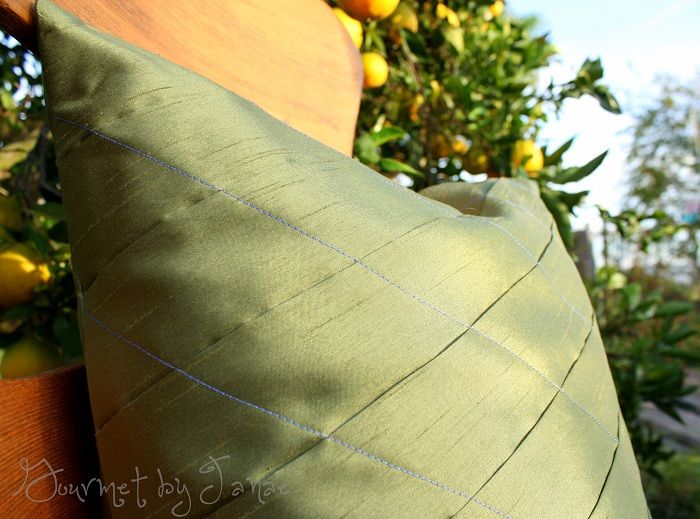
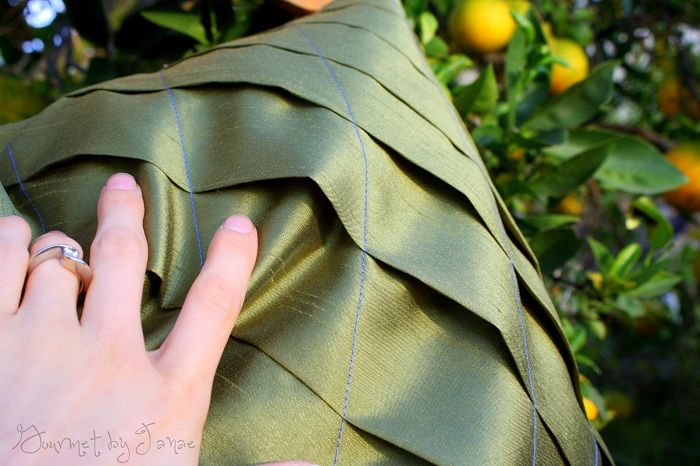
Along with these, I made one extra throw pillow for fun. It has large pleats that are sewn in place, creating little pocket-like structures all over it. This makes for an interesting texture on the front.

I like the color scheme she chose. I also really like how all of these shapes go together to give you the impression of peacock feathers without blatantly showing one.
I really like this applique technique that I came up with. I've never seen anything like it, but I love the exposed raw edges. It just takes a while to do. It's a good thing I'm
I love these feathered pillows with the surprise of color peeking out from underneath the layers. I think they're fun.
My favorite one is the last one I made. A combination of the colors, the design, the pattern and placement of the applique... There's something about it I find really aesthetically pleasing.
All of them have sham-style openings in the back and are all machine washable (a must-have for anyone with kids).
Along with these, I made one extra throw pillow for fun. It has large pleats that are sewn in place, creating little pocket-like structures all over it. This makes for an interesting texture on the front.
The good news for you: this one is for sale!
Go see it in my Etsy shop.
And thanks for stopping by.
Linked up to:
Linked up to:

Monday, December 3, 2012
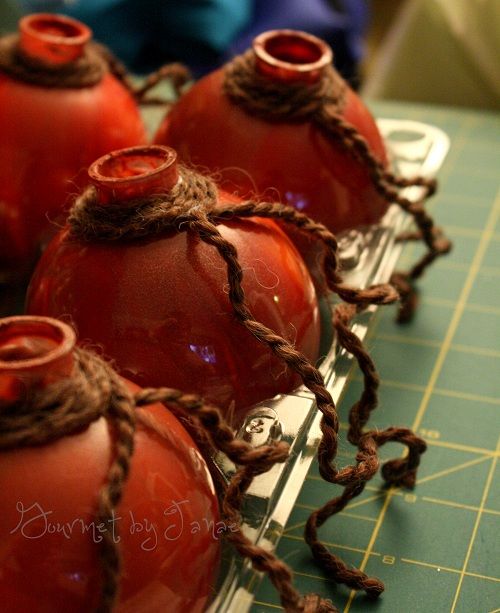
DIY Marbled Globe Christmas Ornaments
I watched my mom make countless decorations and gifts throughout my childhood for holidays and birthdays. She was and still is an incredibly creative and talented woman.
One of my all-time favorite decorations she made were these beautiful marbled globe Christmas tree ornaments.

They're easy as can be and really inexpensive. I made 10 for about $15. Best of all, you can make them whatever colors you want, which makes it simple to coordinate the colors that your tree and room are decorated in during this holiday season.
Here's all you need:
clear globe ornaments (I used plastic ones. glass ornaments + a baby = bad idea)
acrylic paint (in whatever colors you like--I went with reds since trees are green)
twine, beads, or other dangly decorations you so desire (or none at all)
waxed paper


1. Remove the silver tops from the ornaments and set them aside.

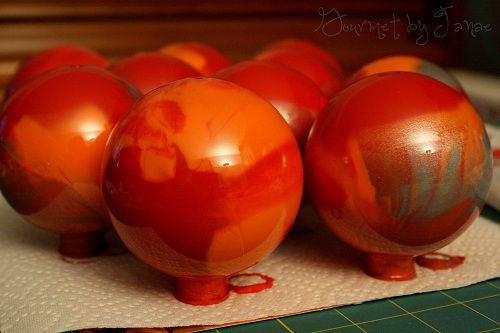
2. Squeeze a small amount of paint into the ornament. Use each of the colors you'd like, but make sure that all the paint combined isn't more than about a tablespoon, or even less if you're making small ornaments.

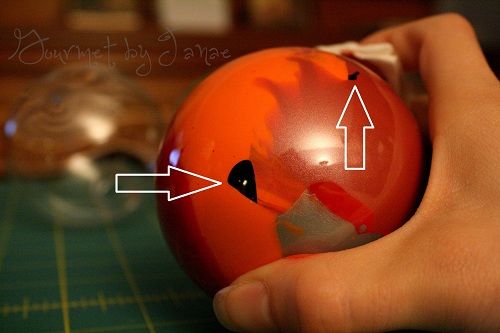
3. Cover the opening (I used a folded piece of paper towel and my thumb) making sure it is completely sealed, and shake the ornament like you're some kind of crazy person.

There may be small gaps where the paint didn't spread to, so I recommend firmly hitting those areas against your palm until some of the paint gets shaken into them.
4. Let them sit upside down on waxed paper for 1-2 hours so that any excess paint drains out of them. You may need to wipe out just inside the opening to get all the extra unnecessary paint out. Then let them sit right side up over night to allow the paint can dry. If the paint still isn't dry after 24 hours, try using a hair dryer to speed up the process. But honestly, if the paint stays tacky (not drippy--drippy can be bad), it's not a huge deal because the paint is enclosed inside of the globe and won't get on anything.

You may notice that the paint doesn't adhere to the glass/plastic in some places, creating this interesting crackle look. It'll happen more often if it doesn't dry. I find it unique and interesting, so I personally like it. If it bugs you, repeat steps 3 and 4, making sure the paint dries before repeating.

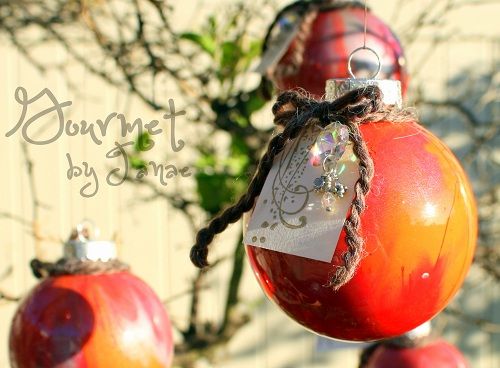
5. Add any additional decorations you want to the outside. I used ModPodge and alpaca yarn, dangly beads, and stamps and cardstock.


6. Once everything is dry and finished, replace the tops on the ornaments. Proceed to decorate your tree or home with them to your little heart's content.
For storing these post-holidays, I recommend heading to Costco and buying a container of apples, eating said apples, and then reusing the plastic container. It's perfect for globe ornaments. You can also use it while making these to keep them from rolling all over the place.

Merry Christmas! Now get crafty and let me know if you make some of your own marbled ornaments. I'd love to see them!
One of my all-time favorite decorations she made were these beautiful marbled globe Christmas tree ornaments.
They're easy as can be and really inexpensive. I made 10 for about $15. Best of all, you can make them whatever colors you want, which makes it simple to coordinate the colors that your tree and room are decorated in during this holiday season.
Here's all you need:
clear globe ornaments (I used plastic ones. glass ornaments + a baby = bad idea)
acrylic paint (in whatever colors you like--I went with reds since trees are green)
twine, beads, or other dangly decorations you so desire (or none at all)
waxed paper
1. Remove the silver tops from the ornaments and set them aside.
2. Squeeze a small amount of paint into the ornament. Use each of the colors you'd like, but make sure that all the paint combined isn't more than about a tablespoon, or even less if you're making small ornaments.
3. Cover the opening (I used a folded piece of paper towel and my thumb) making sure it is completely sealed, and shake the ornament like you're some kind of crazy person.
There may be small gaps where the paint didn't spread to, so I recommend firmly hitting those areas against your palm until some of the paint gets shaken into them.
4. Let them sit upside down on waxed paper for 1-2 hours so that any excess paint drains out of them. You may need to wipe out just inside the opening to get all the extra unnecessary paint out. Then let them sit right side up over night to allow the paint can dry. If the paint still isn't dry after 24 hours, try using a hair dryer to speed up the process. But honestly, if the paint stays tacky (not drippy--drippy can be bad), it's not a huge deal because the paint is enclosed inside of the globe and won't get on anything.
 |
| Don't use a paper towel like I did for this part. It will seep through and some of the paint will dry to it and it turns into a huge mess. |
You may notice that the paint doesn't adhere to the glass/plastic in some places, creating this interesting crackle look. It'll happen more often if it doesn't dry. I find it unique and interesting, so I personally like it. If it bugs you, repeat steps 3 and 4, making sure the paint dries before repeating.
5. Add any additional decorations you want to the outside. I used ModPodge and alpaca yarn, dangly beads, and stamps and cardstock.
For storing these post-holidays, I recommend heading to Costco and buying a container of apples, eating said apples, and then reusing the plastic container. It's perfect for globe ornaments. You can also use it while making these to keep them from rolling all over the place.
Merry Christmas! Now get crafty and let me know if you make some of your own marbled ornaments. I'd love to see them!
Monday, October 15, 2012
Lauren's Throw Pillow #1
One of my brothers and his wife recently bought their first house. It's really exciting for them. My sister-in-law just got some new furniture, including some gorgeous brown leather couches that are in need of some throw pillows. Naturally she called me. ( I really love when people think of me for needs/projects like this!)


She told me the colors she wants (emerald, sapphire, jewel tones) and that she's decorating with a peacock feather theme. She didn't exactly want peacock feathers on the throw pillows, but rather something more abstract. I really love the shapes and lines that peacock feather make.
So I sketched up some ideas and went fabric shopping...

I even kind of made up my own sewing techniques to create this first one. Maybe they've been used before, but I've never seen or heard of anything quite like this.


I really like how this one came out.


I can't decide if I should add a button on the back or not.

I'm excited to work on the other ideas for the rest of the throw pillows.
What do you think?
Tuesday, August 21, 2012
Paying It Forward
There’s a pay-it-forward crafty plan underway, and lots of bloggers appear to be joining in!
So, here’s how this pay-it-forward thing works:
I will send a surprise gift to the first three commenters on this post (and if there are more I might just send out more). The gift will be a handmade surprise by me and I will send it to you sometime in the next 365 days. All you need to do is the following:
I will send a surprise gift to the first three commenters on this post (and if there are more I might just send out more). The gift will be a handmade surprise by me and I will send it to you sometime in the next 365 days. All you need to do is the following:
- Leave me a comment and include your email address (if you profile doesn’t link back) so I can get in touch with you about your mailing address and some other information about yourself.
- To complete signing up, you MUST play along too by blogging a similar post and pledging to make a surprise for the first 3 people who comment on it.
So, do you want to play along?
Comment below, and I’ll send a thoughtful gift to the first three people who do.
Let's pay it forward to one another!
Comment below, and I’ll send a thoughtful gift to the first three people who do.
Let's pay it forward to one another!
Subscribe to:
Posts (Atom)