Alright, it's official. I'm no longer posting here...
Because I'm starting to post on my new blog!
My first post went up there today. However, I'm waiting to throw a full-blown launch party until Monday next week so that I can work out all the kinks and problems. It still does have some little quirks, so please forgive me while I work those out.
Please, please follow me there! I'll be posting in Facebook and on Twitter as new posts go up, and once I get the RSS feed working and get links to other social media hubs up and running, you ought to be able to follow me as you please.
So go and see my latest post! There's a free printable template for some really cute Valentine candy boxes. I think you'll like them!

Showing posts with label organization. Show all posts
Showing posts with label organization. Show all posts
Wednesday, January 30, 2013
Monday, December 17, 2012
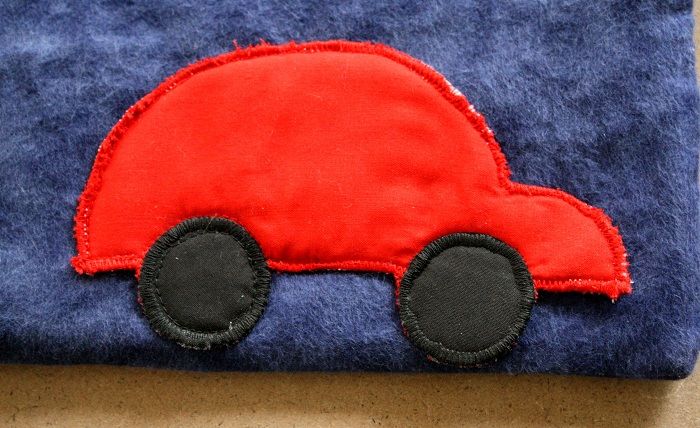
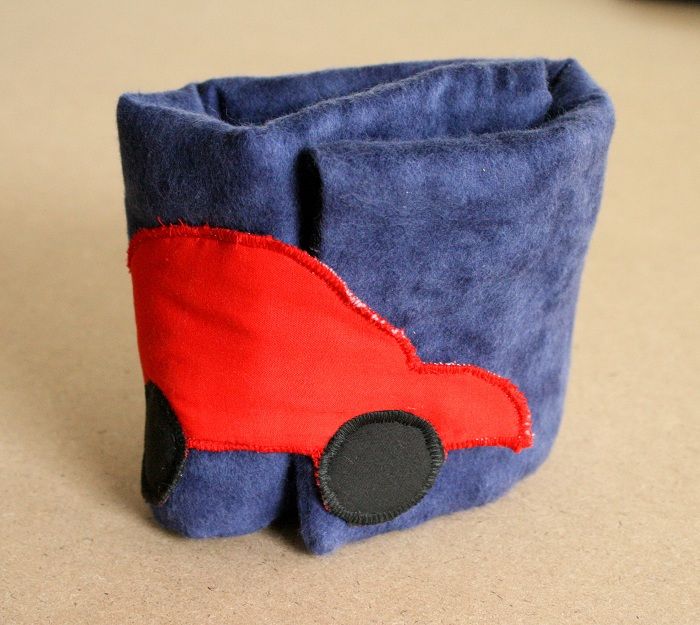
Car Caddies
I love these things. I've seen a few basic tutorials for these, but (me being me) I'm not satisfied with plain, basic anything. No, no--I need everything I make to be a work of art (because I"m anal crazy OCD just that way).
I've made a few of these before, and I generally use whatever fabric I have, because leftover scraps from previous projects are awesome for these things. Plus, it makes each one more individual and unique. I also rarely use a pattern. I just know the size it needs to be and then I make up the design for the road on my own. It's been different every time.
A few months ago my friend Holly asked me to make a personalized one for her son, with his name on the pockets instead of numbers. I was swamped with other projects at the time (and let's be honest, when am I not?) so I planned to have it done and to her by Christmas. Then my cousin Marissa asked me for two as Christmas gifts too.
So I made a pattern this time, because it was easier to cut all the little tiny pieces of fabric out all at the same time, and then do each step on all three at the same time. I also have a feeling I'll be making more of these in the future, and a pattern will help them go quicker.
Here's how these turned out this time around.
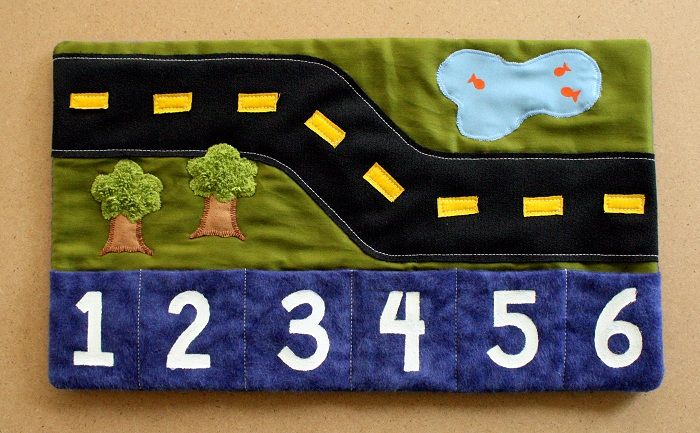
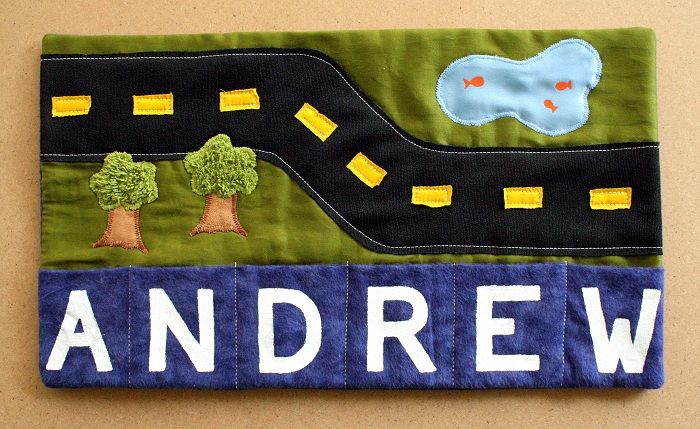
Can I brag for a minute here? The numbers/letters are painted on using white acrylic paint. I free-handed these! No stencils used! It did take longer than using a stencil, but I was curious about whether I could do it or not. Survey says... I succeeded.
I did something new on these ones too, and I really like it. I used some fabrics with various textures for different little details in it. The road is a rough polyester, the pond a shiny satin, the tree trunk is suedecloth, and the tree leaves are terry cloth. I used orange acrylic paint and did some very careful painting to get those fish in the pond.

Isn't that cute and fun?!
I couldn't just use webbing or ribbon for the latch to keep it closed. Of course not. I made a velcro latch for it in the shape of a car.
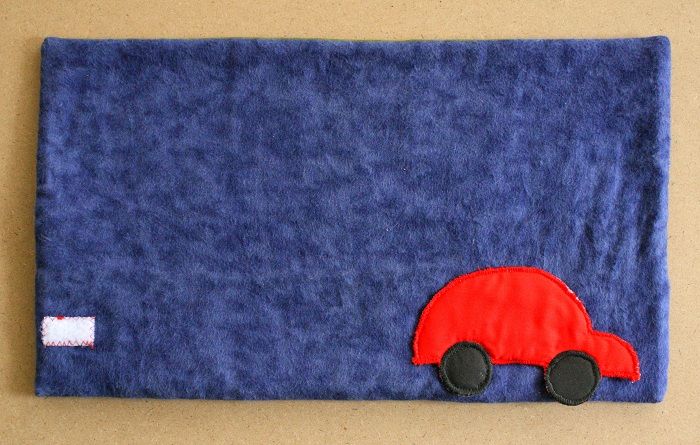
I'm pretty happy with these results. What do you think?
I've made a few of these before, and I generally use whatever fabric I have, because leftover scraps from previous projects are awesome for these things. Plus, it makes each one more individual and unique. I also rarely use a pattern. I just know the size it needs to be and then I make up the design for the road on my own. It's been different every time.
A few months ago my friend Holly asked me to make a personalized one for her son, with his name on the pockets instead of numbers. I was swamped with other projects at the time (and let's be honest, when am I not?) so I planned to have it done and to her by Christmas. Then my cousin Marissa asked me for two as Christmas gifts too.
So I made a pattern this time, because it was easier to cut all the little tiny pieces of fabric out all at the same time, and then do each step on all three at the same time. I also have a feeling I'll be making more of these in the future, and a pattern will help them go quicker.
Here's how these turned out this time around.
I did something new on these ones too, and I really like it. I used some fabrics with various textures for different little details in it. The road is a rough polyester, the pond a shiny satin, the tree trunk is suedecloth, and the tree leaves are terry cloth. I used orange acrylic paint and did some very careful painting to get those fish in the pond.
Isn't that cute and fun?!
I couldn't just use webbing or ribbon for the latch to keep it closed. Of course not. I made a velcro latch for it in the shape of a car.
I'm pretty happy with these results. What do you think?
Monday, November 5, 2012
My Latest Creation...
The most recent thing I've made is a little unorthodox for myself and my blog. But I did make it, nonetheless.
I've had a laptop for the past while. I bought it refurbished for pretty cheap and it worked really well for a while. But ever since I've gotten my Canon Rebel, and been putting hundreds and hundreds of pictures on it, it's been getting really bogged down. It's not made to handle that much stuff, or any PC games that I like to play with my brothers. It was time for an upgrade. I started looking at computers a few months ago, trying to decide what to get. I asked my brother, who studied computer science in college and has had a passion for it for nearly all of his life, and he suggested that I build my own.
I'd never even considered that. I don't know enough about computer to even know where to start. But that's what he was there for. I told him my wishes and needs for this new computer, and he told me what parts I should get. I bought them from Newegg and used a bunch of discounts.
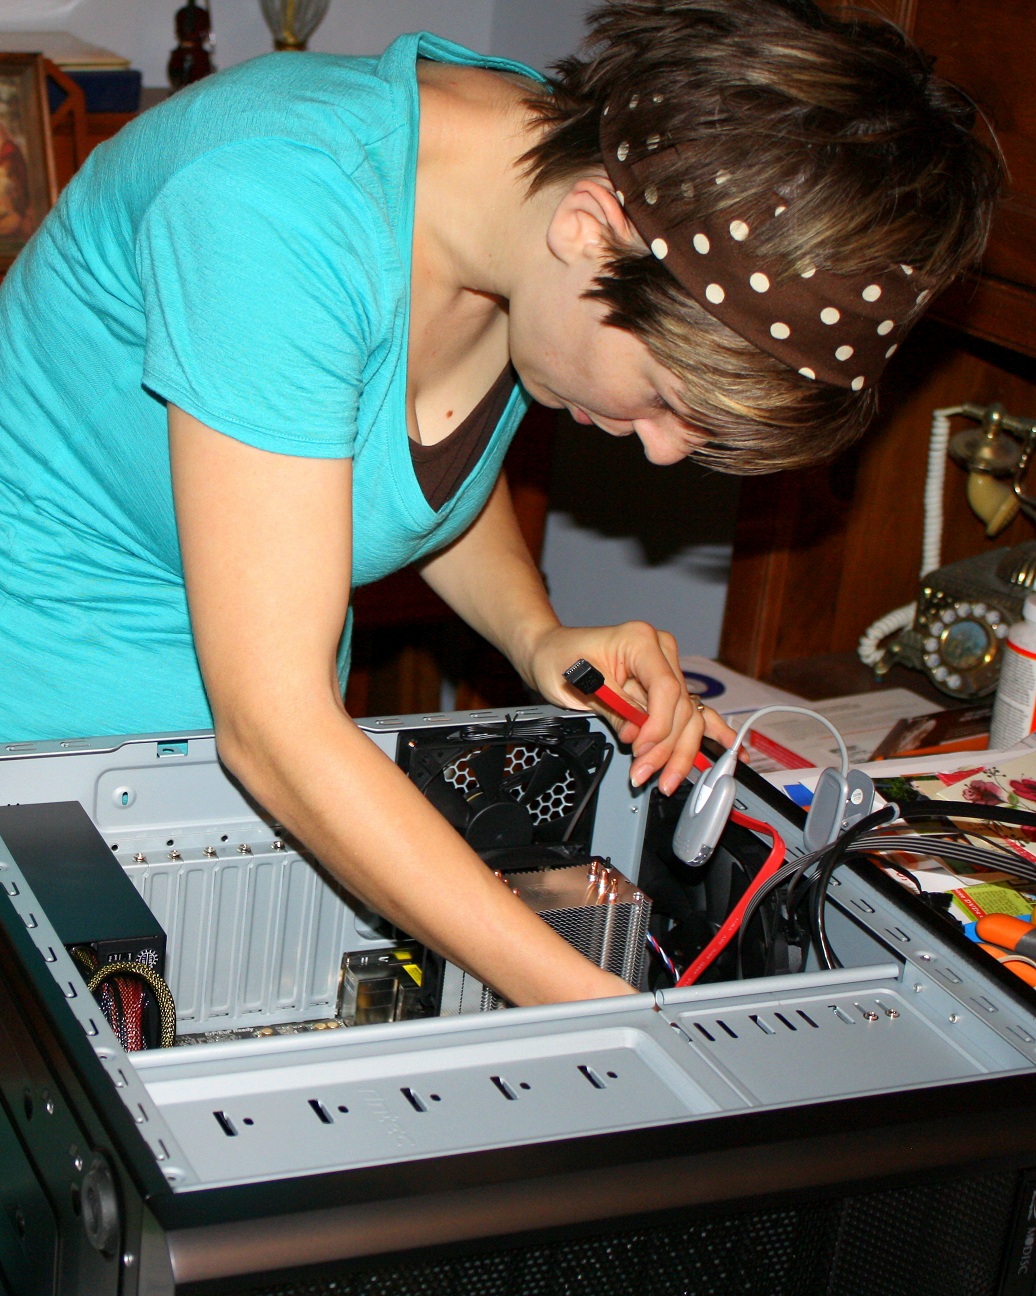
The boxes arrived here the following day. And I got to work.

It was much easier than I anticipated. In the past when I'd look inside a computer, my eyes would gloss over and I'd suddenly feel like everyone around me was speaking some language I didn't know. It always intimidated me and I could never understand how people did it.
So I did some research online, learning about how to build a computer. I looked up tutorials, DIY forums, and asked my brother a few questions I needed answered, and then I went for it.
Everything plugs into the power source and the motherboard, and it's impossible to plug something into the wrong spot because of how each cord and plug is made. So you can really only put it together the right way.
I'm quite pleased with it. Now I can install all the games I want, put all the pictures on it I want, and run whatever programs I need to , and it can more than handle it all.


Now my only problem is this slow internet connection. That's a problem for another day I suppose.
So, if you're considering a new computer and you're not sure where to start, consider building your own! And if you're not very experienced with that, I guarantee there's plenty of help out there.
What kind of computer do you have and do you wish it was different?
I've had a laptop for the past while. I bought it refurbished for pretty cheap and it worked really well for a while. But ever since I've gotten my Canon Rebel, and been putting hundreds and hundreds of pictures on it, it's been getting really bogged down. It's not made to handle that much stuff, or any PC games that I like to play with my brothers. It was time for an upgrade. I started looking at computers a few months ago, trying to decide what to get. I asked my brother, who studied computer science in college and has had a passion for it for nearly all of his life, and he suggested that I build my own.
I'd never even considered that. I don't know enough about computer to even know where to start. But that's what he was there for. I told him my wishes and needs for this new computer, and he told me what parts I should get. I bought them from Newegg and used a bunch of discounts.
The boxes arrived here the following day. And I got to work.
 |
| Making sure everything got shipped. |
 |
| Reading manuals before taking anything out of its packaging. |
It was much easier than I anticipated. In the past when I'd look inside a computer, my eyes would gloss over and I'd suddenly feel like everyone around me was speaking some language I didn't know. It always intimidated me and I could never understand how people did it.
So I did some research online, learning about how to build a computer. I looked up tutorials, DIY forums, and asked my brother a few questions I needed answered, and then I went for it.
Everything plugs into the power source and the motherboard, and it's impossible to plug something into the wrong spot because of how each cord and plug is made. So you can really only put it together the right way.
I'm quite pleased with it. Now I can install all the games I want, put all the pictures on it I want, and run whatever programs I need to , and it can more than handle it all.


 |
| Organizing wires is important for maximum airflow so that things don't overheat on the inside. This is what the inside looked like right after I plugged everything in, before organizing it. |
 |
| And this is the final product! Look at how clean and organized the inside is! |
So, if you're considering a new computer and you're not sure where to start, consider building your own! And if you're not very experienced with that, I guarantee there's plenty of help out there.
What kind of computer do you have and do you wish it was different?
Tuesday, August 21, 2012
Paying It Forward
There’s a pay-it-forward crafty plan underway, and lots of bloggers appear to be joining in!
So, here’s how this pay-it-forward thing works:
I will send a surprise gift to the first three commenters on this post (and if there are more I might just send out more). The gift will be a handmade surprise by me and I will send it to you sometime in the next 365 days. All you need to do is the following:
I will send a surprise gift to the first three commenters on this post (and if there are more I might just send out more). The gift will be a handmade surprise by me and I will send it to you sometime in the next 365 days. All you need to do is the following:
- Leave me a comment and include your email address (if you profile doesn’t link back) so I can get in touch with you about your mailing address and some other information about yourself.
- To complete signing up, you MUST play along too by blogging a similar post and pledging to make a surprise for the first 3 people who comment on it.
So, do you want to play along?
Comment below, and I’ll send a thoughtful gift to the first three people who do.
Let's pay it forward to one another!
Comment below, and I’ll send a thoughtful gift to the first three people who do.
Let's pay it forward to one another!
Monday, August 20, 2012
Matching Bulletin & Chalk Boards
I've been in desperate need of a bulletin board. Two bulletin boards, actually. But the one I'm showing here on is for my craft area. I also need something to write goals on and update each day or week, like a chalk board. So I got to work.

My mother-in-law has tons of picture frames. She even has a couple of bulletin boards that she isn't using. And she kindly let me have what I needed for my project.

I found the fabric that I'd originally used to upholster our headboard. I ended up hating it on the headboard because there was just too much surface area for the print to look nice. So I reupholstered the headboard last year (which I'll post about later) and kept the printed fabric for something like this. I had planned on making throw pillows with it (and I have plenty left so I probably still will). But then I needed fabric for this project. It's perfect for it.
Here's my supplies.


ancient bulletin board (check out that beat up metal frame around it!)
large picture frame
fabric
thumbtacks
masonite (or other type of thin plywood type of stuff)
chalkboard paint
paint brush (use a roller for a perfectly smooth finish)
frame hanging hardware
scissors
a pen
staple gun (but I should have used a hot glue gun... you'll see why...)
masking tape (to hold things in place when you need it to)
Now, the bulletin board was a breeze!


And I was done. It took me about an hour to do all of that (excluding 24 hours for the E6000 glue to dry). So fast and easy!
Then came the chalk board. It started out easy, but it got difficult and frustrating. That chalkboard itself was a cinch to paint, but the frame is the part that wasn't so easy. Looking back now, I know what I should have done instead. So if you want to make one of these yourself, please please take my advice and save yourself from the frustration that I put myself through!
I found this tintable chalkboard paint.

I had planned on a black board, but when I saw that I could color it, I just couldn't resist. I spent the extra $4 and got it in "coffee" because I love browns, and it would perfectly match the fabric I was using.

A roller is recommended for painting this stuff, but I like the slightly textured look a brush gives, so I decided to make it look more vintage and risk using a brush, hoping it wouldn't compromise being able to write clearly on it.
As it was drying I got to work covering the frame with the fabric. Here's where all of my mistakes happened.
What I did was use four long fabric strips to wrap around each side of the frame.
What I should have done is cut a rectangular piece a couple of inches bigger than the frame, like I did with the bulletin board, and then cut the center out.

And then the frame itself... I should not have used a rock-hard old oak frame.
And when I realized it was a rock-hard, old oak frame, I should have resorted to hot glue instead of a staple gun.
However, since I'm stubborn and my head is apparently much harder than that frame is, I got a hammer to finish driving in those staples. What actually happened was I squished and bent the staples into the frame instead of driving them in any farther.
One thing I did right was use Fray Check to keep the corners and raw edges from fraying.


So, when you want to wrap a frame in fabric, use a whole rectangle of fabric.
Cut out the center, leaving a couple of inches of width to wrap around the frame.
Lay the frame over the fabric. Make angled cuts in the fabric toward the corners.
Hot glue the fabric into place.
Fray Check the corners.
Install hanging hardware, secure chalkboard in frame, and hang up.


The next one I make will be so much simpler and I will follow those instructions. It'll probably look better too. Just you wait and see.


I found the fabric that I'd originally used to upholster our headboard. I ended up hating it on the headboard because there was just too much surface area for the print to look nice. So I reupholstered the headboard last year (which I'll post about later) and kept the printed fabric for something like this. I had planned on making throw pillows with it (and I have plenty left so I probably still will). But then I needed fabric for this project. It's perfect for it.
Here's my supplies.


large picture frame
fabric
thumbtacks
masonite (or other type of thin plywood type of stuff)
chalkboard paint
paint brush (use a roller for a perfectly smooth finish)
frame hanging hardware
scissors
a pen
staple gun (but I should have used a hot glue gun... you'll see why...)
masking tape (to hold things in place when you need it to)
Now, the bulletin board was a breeze!
I cut the fabric a few inches larger than the bulletin board.

I tacked in the corners.

Then I marked every half inch and pushed thumbtacks into each marking, pulling the fabric tight as I went.

I wrapped the fabric around to the back or the board, folded the raw edges under, and tacked it in place.

I put the hanging hardware on.
This bulletin board was tricky, though. The back of it is corkboard as well and wouldn't hold the hardware on very well. Problem solved: E6000 glue and a paint stir stick.
This bulletin board was tricky, though. The back of it is corkboard as well and wouldn't hold the hardware on very well. Problem solved: E6000 glue and a paint stir stick.


And I was done. It took me about an hour to do all of that (excluding 24 hours for the E6000 glue to dry). So fast and easy!
 |
| Do you like how my husband put himself on my chalkboard 'To Do' list (and left check-off boxes for every day of the week)? How I love him. |
I found this tintable chalkboard paint.


A roller is recommended for painting this stuff, but I like the slightly textured look a brush gives, so I decided to make it look more vintage and risk using a brush, hoping it wouldn't compromise being able to write clearly on it.
As it was drying I got to work covering the frame with the fabric. Here's where all of my mistakes happened.
What I did was use four long fabric strips to wrap around each side of the frame.
What I should have done is cut a rectangular piece a couple of inches bigger than the frame, like I did with the bulletin board, and then cut the center out.

And then the frame itself... I should not have used a rock-hard old oak frame.
And when I realized it was a rock-hard, old oak frame, I should have resorted to hot glue instead of a staple gun.
However, since I'm stubborn and my head is apparently much harder than that frame is, I got a hammer to finish driving in those staples. What actually happened was I squished and bent the staples into the frame instead of driving them in any farther.
One thing I did right was use Fray Check to keep the corners and raw edges from fraying.


So, when you want to wrap a frame in fabric, use a whole rectangle of fabric.
Cut out the center, leaving a couple of inches of width to wrap around the frame.
Lay the frame over the fabric. Make angled cuts in the fabric toward the corners.
Hot glue the fabric into place.
Fray Check the corners.
Install hanging hardware, secure chalkboard in frame, and hang up.

It's recommended to rub chalk all over the board and then erase it before the first use. This coats the chalkboard with a nice layer of chalk dust and helps it erase more evenly.


The next one I make will be so much simpler and I will follow those instructions. It'll probably look better too. Just you wait and see.


Linked up to: Polkadot Pretties
Wednesday, July 18, 2012
Pretty Little Mess Kit Bag
This week for Girls Camp, each young woman needs a mess kit for eating meals. Just about any reusable bowl, plate, cup, fork, and spoon will do. But they need a mesh bag to hold it all in, and almost none of our girls have one.

I decided the girls could each make their own if they needed one.
The bag should be a material that will allow the dishes to dry, either mesh or something like it. I have a closet full of fabric, so I was pretty certain that I'd have something that would work.
I have yards and yards of this polyester black lace. It's horrible and I'd never use it for clothing. It's really only good for a tablecloth or crafts. And I seriously have tons of it. I'm happy to get rid of some!


When I brought it as a sample to show the girls last week for our Wednesday night activity, they all wanted one, whether they needed one or not! Everyone loved it. So we got to work cutting, sewing, and stringing ribbon through to tops.
These are perfect for this week of camp, because after our dishes are washed, we can load them back into the bags, hang them up, and they'll dry in no time! Plus, they're super adorable and can be used for countless other things after camp.


I decided the girls could each make their own if they needed one.
The bag should be a material that will allow the dishes to dry, either mesh or something like it. I have a closet full of fabric, so I was pretty certain that I'd have something that would work.
Oh, did I ever!!
I have yards and yards of this polyester black lace. It's horrible and I'd never use it for clothing. It's really only good for a tablecloth or crafts. And I seriously have tons of it. I'm happy to get rid of some!

So I made myself a bag just to practice.
It turned out SO cute!


Monday, July 16, 2012
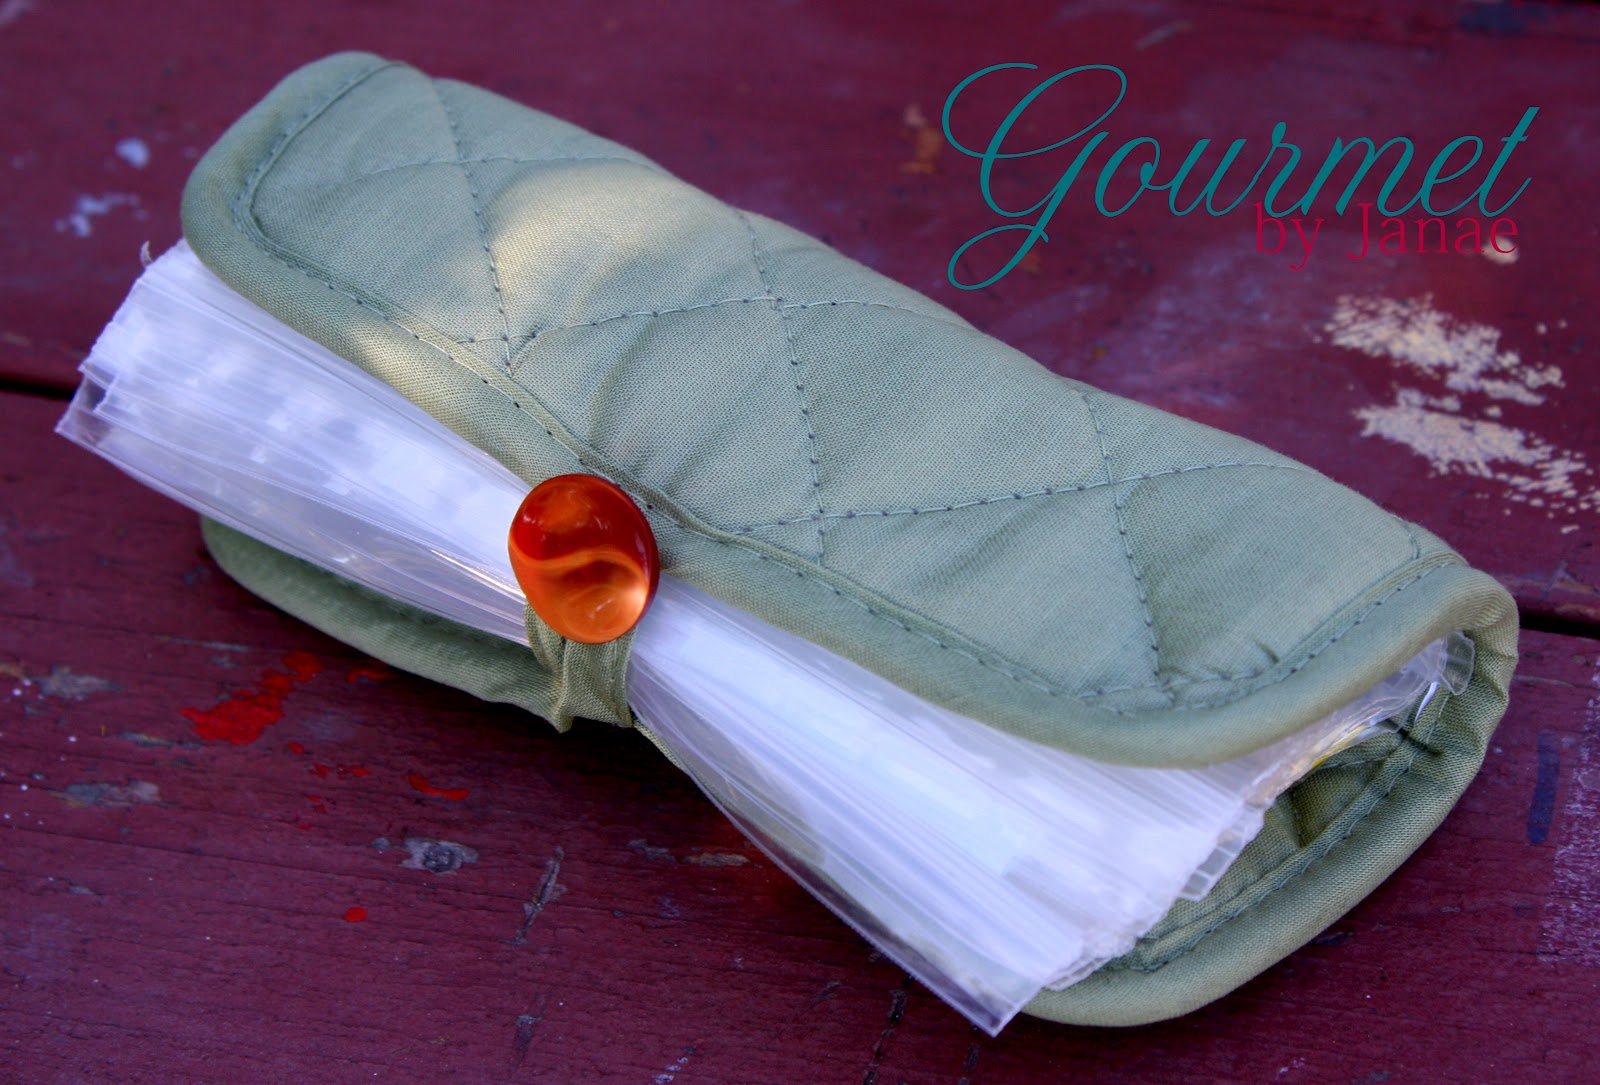
Pot-Holder First Aid Kit
This week for our annual church Young Women Camp, we're making sure our girls are prepared. One thing we had each of them make is a first aid kit. They're super easy to make and I think they're pretty cute, too.


For each kit you'll need:
a square potholder
(we got ours at the dollar store)
6-10 snack sized ziplock bags
(use what you need according to the amount of supplies you want to go in it)
first aid supplies
(small or individually wrapped items are good--ointment, bandaids, gauze squares, latex gloves, hard candies, Q-tips, matches, duct tape, medical tape, ibuprofen, etc.)
a button
sewing machine, thread, & straight pins
You see how to do this, right? Well here are some tips:


It's pretty fun to flip through and see all of the supplies. I bet this would be great for other things too--a travel sewing kit, travel jewelry organizer, organizing buttons...


For each kit you'll need:
a square potholder
(we got ours at the dollar store)
6-10 snack sized ziplock bags
(use what you need according to the amount of supplies you want to go in it)
first aid supplies
(small or individually wrapped items are good--ointment, bandaids, gauze squares, latex gloves, hard candies, Q-tips, matches, duct tape, medical tape, ibuprofen, etc.)
a button
sewing machine, thread, & straight pins
You see how to do this, right? Well here are some tips:
- Before you sew the bags on, make sure the loop on the potholder is on the side that the zippers are on so you can button it closed.
- The bags are really slick, so pin them into place at the sides where you start and end sewing.
- Use a button that is big enough to hold it closed but small enough to fit though the loop.


What else would you use one of these for?
Wednesday, June 20, 2012
Roll-up Crochet Hook Case
I made this for one of my sisters-in-law for Christmas a while back. She's a crochet maniac and is darn good at it too. But she had so many crochet hooks and other crocheting tools and no way to keep them organized. She told me that she just kept them all in a large ziploc bag. Classy, right?
Then she saw the Roll-up Pencil Case that I'd made for myself. I was so excited to see what other possibilities a roll-up case could be used for. So she sent me all of the sizes of crochet hooks and supplies she needed it to store. And here's what I came up with.


I got the applique inspiration from the print on one of the ribbons I used on it. I put two buttons on the ribbon closure so that she could pick whichever one would keep it wrapped best--more tightly or more loosely.
She's really talented too, by the way. I was so excited to see what she would make for Graham when he was born. This owl hat is possibly my favorite thing she made for him.
She had an Etsy store for a while, but business slowed down for her a bit so she stopped, plus she has three kids and a fourth on the way. However, she does still take requests. If you're interested in having her crochet something, let me know and I'll get you in touch with her.
And a special thanks to my friend Julienne for our lovely newborn photos! She and her husband are incredibly talented with a camera. Check out their blog and their Facebook page.
Then she saw the Roll-up Pencil Case that I'd made for myself. I was so excited to see what other possibilities a roll-up case could be used for. So she sent me all of the sizes of crochet hooks and supplies she needed it to store. And here's what I came up with.

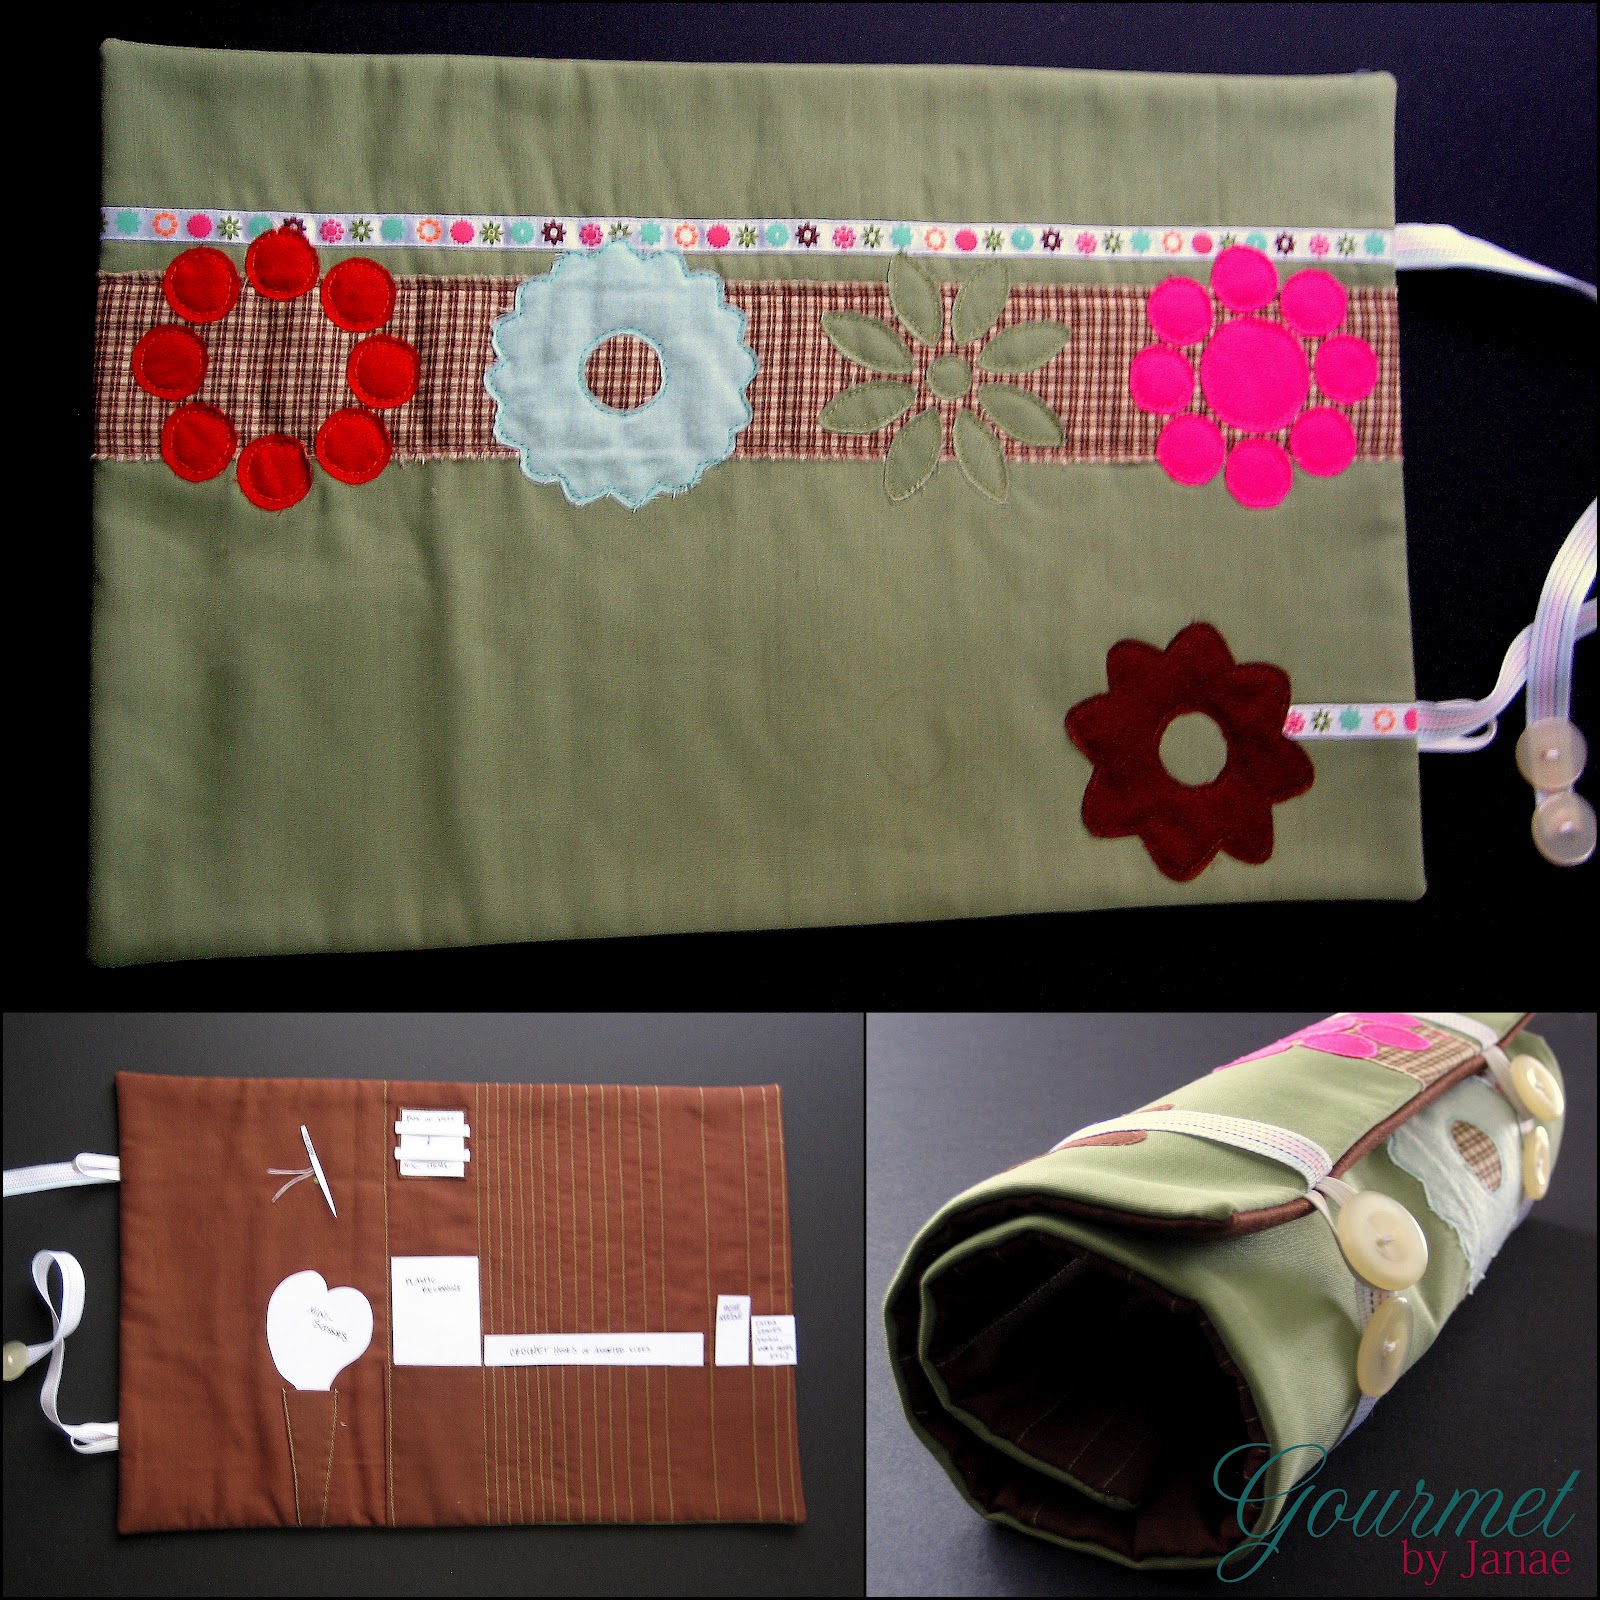
I got the applique inspiration from the print on one of the ribbons I used on it. I put two buttons on the ribbon closure so that she could pick whichever one would keep it wrapped best--more tightly or more loosely.
She's really talented too, by the way. I was so excited to see what she would make for Graham when he was born. This owl hat is possibly my favorite thing she made for him.
 |
| Yes, this is my adorable son at 2 weeks old. |
She had an Etsy store for a while, but business slowed down for her a bit so she stopped, plus she has three kids and a fourth on the way. However, she does still take requests. If you're interested in having her crochet something, let me know and I'll get you in touch with her.
And a special thanks to my friend Julienne for our lovely newborn photos! She and her husband are incredibly talented with a camera. Check out their blog and their Facebook page.
Subscribe to:
Posts (Atom)